LCDuino

LCDuino is an arduino clone, currently under development, based on ATMega328p or ATMega1284p specifically designed to be fitted with an LCD display. Key aspects are:

  • Compact form factor, size of the board is the same as size of the display, display and the board are held together by four hex spacers
  • Battery operated, runs on one, two or three AA or AAA batteries or from CR2032, there is a voltage step up converter on board to convert battery voltage to 5V, 3.3V or 2.7V. For 3.3V and 2.7V version there is another 5V step up converter to power the display. Batteries fit between the board and the display.
  • Prototyping area, the board contains a small prototyping area where you can solder your own circuits and sensors which readings you can display on the display.
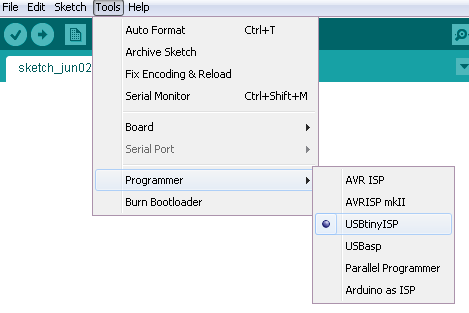
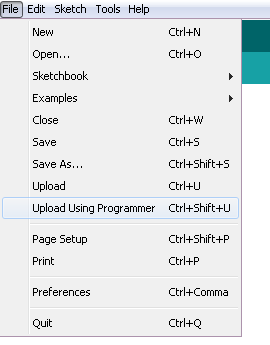
  • Low cost, minimum parts. The board doesn't have USB connector, it's programmable using ICSP or you can solder port for FTDI cable.
  • Programmable directly from Arduino IDE like any other arduino, using any AVR programmer, ICSP header included
  • Power management. You can power the display and 5V rail directly from power supply or from a pin, this way you can turn all devices off from the sketch to save the power in idle
  • Can sense battery voltage on extra pins A6 or A7.
  • Runs using internal oscilator by default at 1Mhz or 8Mhz (to save battery power). Has a socket to install external oscilator up to 20Mhz
  • Multiple available form factors for various display sizes. Right now we have boards to fit industry standard 8x2 text display, 16x2 text display both 16 pins, 128x64 graphics display 20 pins.

How to program the board

To decrease cost of the board and increase battery life and usable space, the board doesn't have USB interface, to program it you need an ISP programmer. Get one from eBay for under $3, you need 6 pin cable, or 10 and 10 to 6 adapter. Or you can use Arduino as ISP programmer as well. Boards can be programmed from Arduino IDE. To upload a sketch from Arduino IDE first select the programmer from tools menu

Then click Upload using a programmer from file menu
Make sure you select Arduino Nano from the boards menu.

LCDuino 0802

Sample code for 9V (white) board

#include <LiquidCrystal.h>


#define RS 6
#define E 7
#define D4 11
#define D5 10
#define D6 13
#define D7 12
#define BL 9

// initialize the library with the numbers of the interface pins
LiquidCrystal lcd(RS, E, D4, D5, D6, D7);

void setup() {
  // set up the LCD's number of columns and rows: 
  lcd.begin(16, 2);
  pinMode(BL, OUTPUT);
  //digitalWrite(BL, HIGH);
  analogWrite(BL, 48);
  // Print a message to the LCD.
  lcd.clear();
  lcd.print("LCDuino 1602");
  analogReference(INTERNAL);
  
}


void loop() {
  lcd.setCursor(2, 1);
  int volt = readVoltage(A7);
  if (volt < 1000) lcd.print(" ");
  if (volt < 100) lcd.print(" ");
  if (volt < 10) lcd.print(" ");
  lcd.print(volt);
  lcd.print("mV ");
  delay(500);
}


int readVoltage(byte pin) {
  int val = analogRead(pin);
  return 11.593379 * val;
}


Sample code for 1.5V (purple) board

#include <LiquidCrystal.h>


#define RS 6
#define E 7
#define D4 11
#define D5 10
#define D6 12
#define D7 13
#define BL 9

// initialize the library with the numbers of the interface pins
LiquidCrystal lcd(RS, E, D4, D5, D6, D7);

void setup() {
  // set up the LCD's number of columns and rows: 
  lcd.begin(16, 2);
  pinMode(BL, OUTPUT);
  //digitalWrite(BL, HIGH);
  analogWrite(BL, 48);
  // Print a message to the LCD.
  lcd.clear();
  lcd.print("LCDuino 1602");
  analogReference(INTERNAL);
  
}


void loop() {
  lcd.setCursor(2, 1);
  int volt = readVoltage(A7);
  if (volt < 1000) lcd.print(" ");
  if (volt < 100) lcd.print(" ");
  if (volt < 10) lcd.print(" ");
  lcd.print(volt);
  lcd.print("mV ");
  delay(500);
}


int readVoltage(byte pin) {
  int val = analogRead(pin);
  return 1.5873 * val;
}


LCDuino 1602

Sample code for 3V (black) version

#include <LiquidCrystal.h>


#define RS 6
#define E 7
#define D4 10
#define D5 11
#define D6 12
#define D7 13
#define BL 9

LiquidCrystal lcd(RS, E, D4, D5, D6, D7);

void setup() {
  // set up the LCD's number of columns and rows: 
  lcd.begin(16, 2);
  pinMode(BL, OUTPUT);
  analogWrite(BL, 48);
  // Print a message to the LCD.
  lcd.clear();
  lcd.print("LCDuino 1602");
  analogReference(INTERNAL);
  
}


void loop() {
  lcd.setCursor(10, 1);
  int volt = readVoltage(A6);
  if (volt < 1000) lcd.print(" ");
  if (volt < 100) lcd.print(" ");
  if (volt < 10) lcd.print(" ");
  lcd.print(volt);
  lcd.print("mV ");
  delay(500);
}


int readVoltage(byte pin) {
  int val = analogRead(pin);
  return 3.07159423828125 * val;
}


LCDuino 12864

Sample code for 4.5V (red) board

todo